Watch the #FINDGUS (Find Gus) Brawloween guide video below. Detailed instructions and screenshots will be added as the information is confirmed.
Available Rewards
The rewards available throughout the event are listed below.
Day 1
- Chaos Starr Drop ×1
- Starr Drop ×4
- Coins ×2
One reward contains 100 Coins; the other amount is unconfirmed.
Day 2
- Chaos Starr Drop ×1
- Damian Pin ×1
- Starr Drop ×1
- Power Points ×1 (amount unconfirmed)
Day 3
- Chaos Starr Drop
- Bellenstein's Monster (Piper) pin
Day 4
- Coming soon.
Day 1: Entrance Walkthrough
Assemble the Shovel
Collect the parts from the mailbox on the right, the top of the dead tree on the left, and under the pumpkins at the bottom of the screen.
Combine them to obtain the shovel! Once you have it, break the right door, the left door, and all the pumpkins.

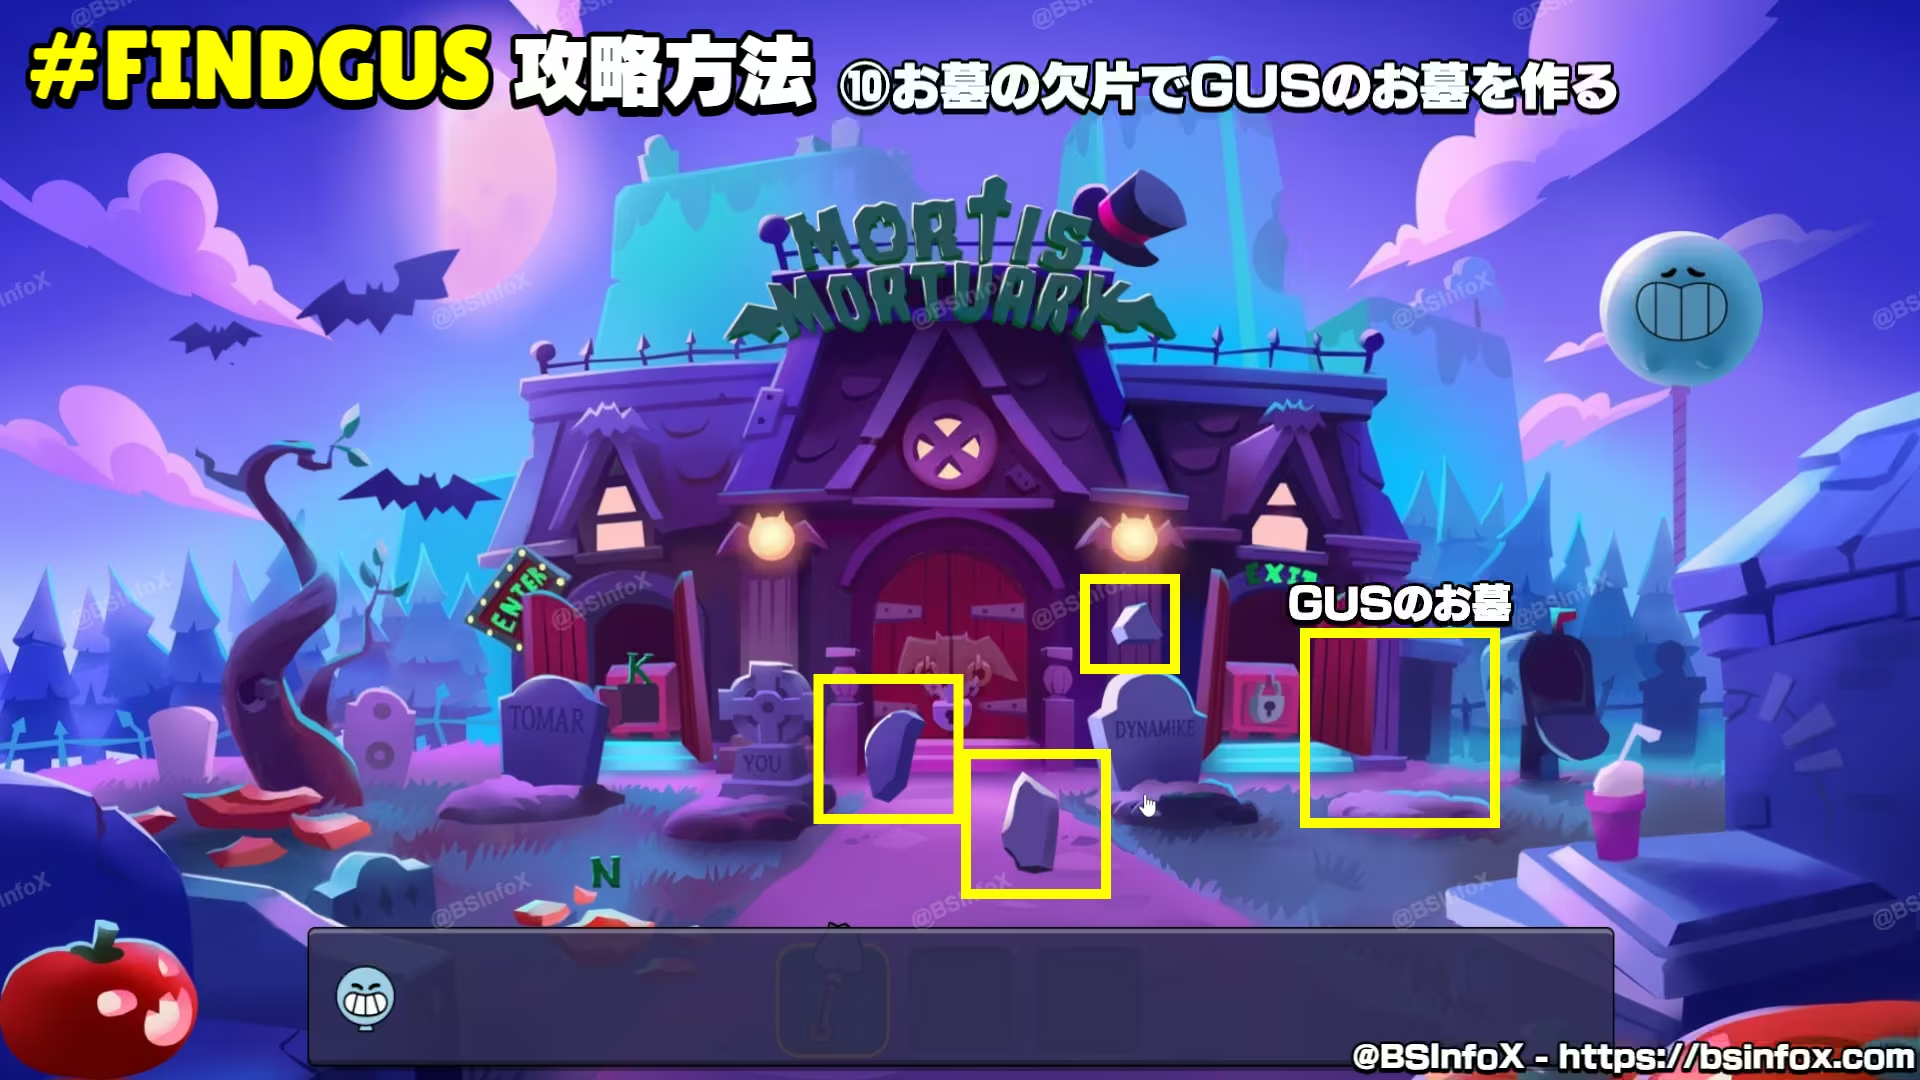
Assemble GUS's Gravestone
Next, light up "TOMAR" on the sign at the top of the screen. The TOMAR grave will glow; dig it four times with the shovel.
This gives you the first of the three pieces of GUS's gravestone.

Similarly, light up "YOU". The YOU grave will glow; dig it four times with the shovel.
This gives you the second piece of GUS's gravestone.

Then light up "DYNAMIKE". The DYNAMIKE grave will glow; dig it four times with the shovel.
This gives you the third and final piece of GUS's gravestone.

Place all three pieces in the empty grave spot on the right to assemble GUS's gravestone!
Next, light up "GUS". GUS's grave will glow; dig it four times with the shovel again.
You will receive the key to the central door, completing this room and earning a Chaos Starr Drop!

Hidden Rewards
- Break the pumpkin under the tree, then use the key on the safe behind the left door to receive 100 Coins.
- Light up "MORTIS" (all the upper letters), tap the left window once and the right window five times, then move Mortis's hat to the right window to receive a Starr Drop.
- Light up "MONSTER", then tap the dead tree on the right. Gene will appear and give you a Starr Drop.
- Light up "MRTS" on the upper part of the sign and "MORTAY" on the lower part to receive a Starr Drop.
- Light up "DYNAMIKE" again, then dig DYNAMIKE's grave four times to receive a Starr Drop.
Day 2: Hallway Walkthrough
Find the Screwdriver and Activate the Jack-in-the-Box
Pick up the screwdriver at the bottom right of the screen. Use it to open the cabinet on the left, take the handle from inside, attach it to the jack-in-the-box above the cabinet, and turn it four times.
Damian will get angry. Hit him with the frying pan in the center of the screen to calm him down.

Make Damian Lose His Patience and Leave
Next, open and close the wardrobe on the right four times. Damian will get angry again; hit him with the fish at the bottom of the screen to calm him down.
Take the pendulum from inside the wardrobe, attach it to the clock, and set the time to 12 o'clock. Damian will get angry again, so tighten the screw on his head with the screwdriver.
An antenna will then appear below the clock. Attach it to the radio, adjust the radio with the screwdriver, and set it to channel 6.
Damian will get angry again; hit him with the shovel to calm him down.
After he calms down, a key will appear on the wall to the right. Use it to open the safe inside the wardrobe, give the cymbal from the safe to Shade, and have Shade strike it six times.
Damian will finally lose his patience and leave, completing the room and earning you a Chaos Starr Drop.


Hidden Rewards
- Move the tablecloth off the table, then set the colors on the safe:
Top left: tap 4 times (purple)
Top right: tap 3 times (yellow)
Bottom left: tap 5 times (green)
Bottom right: tap 7 times (red) - Use the lightning tool from the laboratory on the candle at the top of the screen to light it.
Once it is lit, set the clock to 3 o'clock and tap the candle again. The clock will open, revealing a Starr Drop. - Use the lightning tool from the laboratory on the radio, then switch to Supercharge Mode to unlock Channel 10. Tune the radio to Channel 10. Damian will appear and smash the wardrobe, revealing a safe behind the wall. Set the safe's colors as follows:
Top left: 0 taps (leave the color unchanged)
Top right: 3 taps (yellow)
Bottom left: 7 taps (purple)
Bottom right: 6 taps (white)
This gives you 100 Power Points!

- Use the lightning tool from the laboratory on the candle at the top of the screen to light it.
Once it is lit, set the clock to 3 o'clock and tap the candle again. The clock will open, revealing a Starr Drop.

- Use the lightning tool from the laboratory on the radio, then switch to Supercharge Mode to unlock Channel 10. Tune the radio to Channel 10. Damian will appear and smash the wardrobe, revealing a safe behind the wall. Set the safe's colors as follows:
Top left: 0 taps (leave the color unchanged)
Top right: 3 taps (yellow)
Bottom left: 7 taps (purple)
Bottom right: 6 taps (white)
This gives you 100 Power Points!

Day 3: Laboratory Walkthrough
Craft the Lightning Tool
Open the drawer in the desk at the front of the room and take out the part. There are three machines on the desk. Combine that part with the one on top of the leftmost machine and the one at the tip of the rightmost machine to craft the lightning tool.

Stage 1: Mix the Colors
| Capsule | Color to Make | Combination |
|---|---|---|
| 1st | Orange | Red + Yellow |
| 2nd | Green | Blue + Yellow |
| 3rd | Purple | Blue + Red |
| 4th | Pink | Red + White |
These are the color combinations needed for this stage. 'Capsules' means the four capsules at the back left of the screen.
Mix the colors, then take each tube to its capsule to attach it. Once they are attached, use the lightning tool to tap every capsule. Piper's body parts will appear; put them together.
Then Belle will give you a sequence, such as 1→2→3→4. Use the lightning tool again in the order she tells you.

Hidden Rewards
| Capsule | Color | Combination |
|---|---|---|
| 1st | Pink | Red + White |
| 2nd | Peach | Red + White + Yellow |
| 3rd | Lavender | Blue + Red + White |
| 4th | Navy | Blue + Black |
Apply these colors to the capsules and send electricity through them with the lightning tool to obtain the Bellenstein's Monster (Piper) pin.

Stage 2: Mix the Colors
| Capsule | Target Color | Combination |
|---|---|---|
| 1st | Peach | Red + White + Yellow |
| 2nd | Olive Green | Blue + Black + Yellow |
| 3rd | Lavender | Blue + Red + White |
| 4th | Slate | Blue + Black + White |
Mix these colors, apply them to the capsules, and send electricity through them with the lightning tool. Belle will give you another sequence, such as 1→2→3→4. Use the lightning tool again in that order.
This completes the event and gives you a Chaos Starr Drop!

After Clearing the Laboratory!
Make sure to return to the Hallway! The Hallway section of this guide lists additional hidden rewards you can now obtain with the lightning tool.
Day 4: ??? Walkthrough
Coming soon… P.M 5:00 JST , maybe
Guide video
Walkthrough Video: Entrance Right-Hand Safe (Day 1)
Walkthrough Video: Hallway (Day 2)
Walkthrough Video: Hallway Hidden Safe and Clock (Day 2)
Video Guide: Laboratory (Day 3)
Video Guide: ??? (Day 4)
This combination gives you Damian's Pin.